

이 글은 부하 테스트를 얼마 안해본 나 같은 사람을 위해 작성한다.

준비물
🐋 Docker
🐙 Docker-Compose
🏔️ K6
☀️ Grafana
💎 influxdb
Step 0. 왜?
왜 이 기술 스택들을 쓴 것인지에 대해서 말하고자한다.
1. K6
사실 부하테스트의 큰 산은 Apache 사에서 만든 jmeter와 대황네이버가 만든 nGrinder가 있다.


하지만 이 두개는 사실 성능이 뛰어나지도, 편리성이 뛰어나지도 않다.
둘 다 JVM 위에서 동작해서 메모리를 많이 먹고 느리다.
특히 Jmeter의 경우 Gui로 인해서 오버헤드가 많이 발생한다. 성능을 요구하는 테스트의 경우 Gui를 안쓰도록 권장 ( 아파치 피셜 )
Jmeter 의 경우에는 xml , nGrinder 의 경우에는 Groovy 를 사용해야한다.
내가 제일 싫어하고 싫어하는 xml 이 등장했다.. 바로 패스
근데 왜써라는 질문엔
생태계가 어마어마하게 크고 예제가 많다 라는 장점이 너무나도 크게 여겨진다.
하지만, 나는 너무나도 최신 스택에 눈이 멀어있기에 당연(?)하게도 더 찾아봤다.
눈에 들어온 것은 K6, Artillrery 와 Locust 셋 다 어느정도 입지를 다진 부하 테스트 툴이다.
대강 정리하자면 이런 느낌이다.
| 구분 | 개발언어 | 테스트용 언어 | 동작 환경 | 개발사 | 출시년도 |
| JMeter | Java | xml | JVM | Apache | 1998 |
| nGrinder | Python, Java | Jython, Groovy | JVM | Naver | 2011 |
| K6 | Go, C | Javascript | Anywhere | Grafana | 2017 |
| Artillery | Javascript | Javascript | Node.js | Shoreditch Ops LTD | 2015 |
| Locust | Python, Typescript | Python | Python | Jonathan Heyman(개인) + Open Source Contributor | 2011 |
여러모로 비교를 해봤다.
1. 러닝커브가 낮은가? -> 나는 Java, Kotlin, JS만 할줄안다.
2. 가볍고 성능이 좋은가? -> 이 안에서는 K6가 가장 가벼웠고 성능도 가장 좋았다
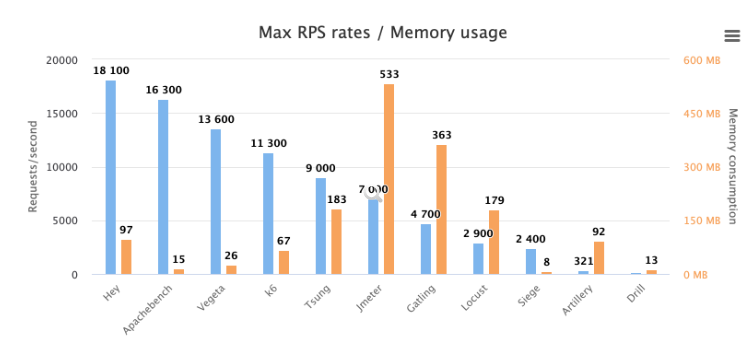

3. 믿을만한 개발사에서 유지보수 하고있는가 -> Jmeter , nGrinder , K6
2번의 연장선이지만 K6 가 다른 환경 위에서 돌아가는게 아닌 OS 그 자체에서 돌아가기에 매우 큰 장점을 가졌거니 했다. (Go는 GOAT가 맞다)
그래서 결국 K6로 가기로 했다.
그리고 Grafana사는 Grafana라는 APM 도구도 지원하기에 연동해서 쓰면 REAL GOAT 가 된다.
2. Grafana
K6는 Grafana에서 만들었다. Grafana는 Granfana도 만들었다 -> 올인원이 된다.
3. influxDB
시계열 DB라서 실시간으로 부하테스트를 하고 정보를 저장하는데 있어서 가장 뛰어난 성능을 보인다.
RDB 의 경우엔 느리고, NoSql의 경우엔 Select 만 빠르다.
Step 1. K6 설치
내 PC는 Windows 11을 사용중이고 랩탑은 MacOS 이담
1. Windows
winget install k6 --source winget2. MacOS
brew install k6다른 OS 설치법은 아래
https://k6.io/docs/get-started/installation/
Installation
k6 has packages for Linux, Mac, and Windows. As alternatives, you can also using a Docker container or a standalone binary.
k6.io
Windows 의 경우에는 당연(?)하게도 환경변수 문제에 직면한다.
공식 문서에는 없지만 환경변수 추가해줘야한다.
다른 경우는 모르겠지만 조금 뒤적거리니 아래 경로에 K6 라는 실행 프로그램이 있었다.
C:\Program Files\k6path 환경 변수에 저 경로 넣어주니 된담
이제 원하는 경로로 이동한다.
나같은 경우에는 root 프로젝트 바로 아래에 stress-test 라는 경로를 만들어서 진행하려한다.
k6 new위 명령어를 실행하면
아래와 같은 공식 예제 파일이 생긴다.
import http from 'k6/http';
import { sleep } from 'k6';

export const options = {
  // A number specifying the number of VUs to run concurrently.
  vus: 10,
  // A string specifying the total duration of the test run.
  duration: '30s',

  // The following section contains configuration options for execution of this
  // test script in Grafana Cloud.
  //
  // See https://grafana.com/docs/grafana-cloud/k6/get-started/run-cloud-tests-from-the-cli/
  // to learn about authoring and running k6 test scripts in Grafana k6 Cloud.
  //
  // cloud: {
  //   // The ID of the project to which the test is assigned in the k6 Cloud UI.
  //   // By default tests are executed in default project.
  //   projectID: "",
  //   // The name of the test in the k6 Cloud UI.
  //   // Test runs with the same name will be grouped.
  //   name: "script.js"
  // },

  // Uncomment this section to enable the use of Browser API in your tests.
  //
  // See https://grafana.com/docs/k6/latest/using-k6-browser/running-browser-tests/ to learn more
  // about using Browser API in your test scripts.
  //
  // scenarios: {
  //   // The scenario name appears in the result summary, tags, and so on.
  //   // You can give the scenario any name, as long as each name in the script is unique.
  //   ui: {
  //     // Executor is a mandatory parameter for browser-based tests.
  //     // Shared iterations in this case tells k6 to reuse VUs to execute iterations.
  //     //
  //     // See https://grafana.com/docs/k6/latest/using-k6/scenarios/executors/ for other executor types.
  //     executor: 'shared-iterations',
  //     options: {
  //       browser: {
  //         // This is a mandatory parameter that instructs k6 to launch and
  //         // connect to a chromium-based browser, and use it to run UI-based
  //         // tests.
  //         type: 'chromium',
  //       },
  //     },
  //   },
  // }
};

// The function that defines VU logic.
//
// See https://grafana.com/docs/k6/latest/examples/get-started-with-k6/ to learn more
// about authoring k6 scripts.
//
export default function() {
  http.get('https://test.k6.io');
  sleep(1);
}
주석을 제거하면 짧아진다.
import http from 'k6/http';
import { sleep } from 'k6';

export const options = {
  vus: 10,
  duration: '30s',
}

export default function() {
  http.get('https://test.k6.io');
  sleep(1);
}
JS를 다뤄봤으면 알겠지만 너어어어무나도 눈이 편하다.
얼마나 편한건지 상대적 우월감을 느끼기 위해서
JMeter의 xml을 구경하고 오면 되겠다.
https://github.com/apache/jmeter/blob/master/bin/templates/templates.xml
jmeter/bin/templates/templates.xml at master · apache/jmeter
Apache JMeter open-source load testing tool for analyzing and measuring the performance of a variety of services - apache/jmeter
github.com

Step 2. K6 테스트
k6 run script.js이야.. 실행 명령어도 친숙하다. NPM 사용할때와 유사한게 까먹기도 힘들겠다
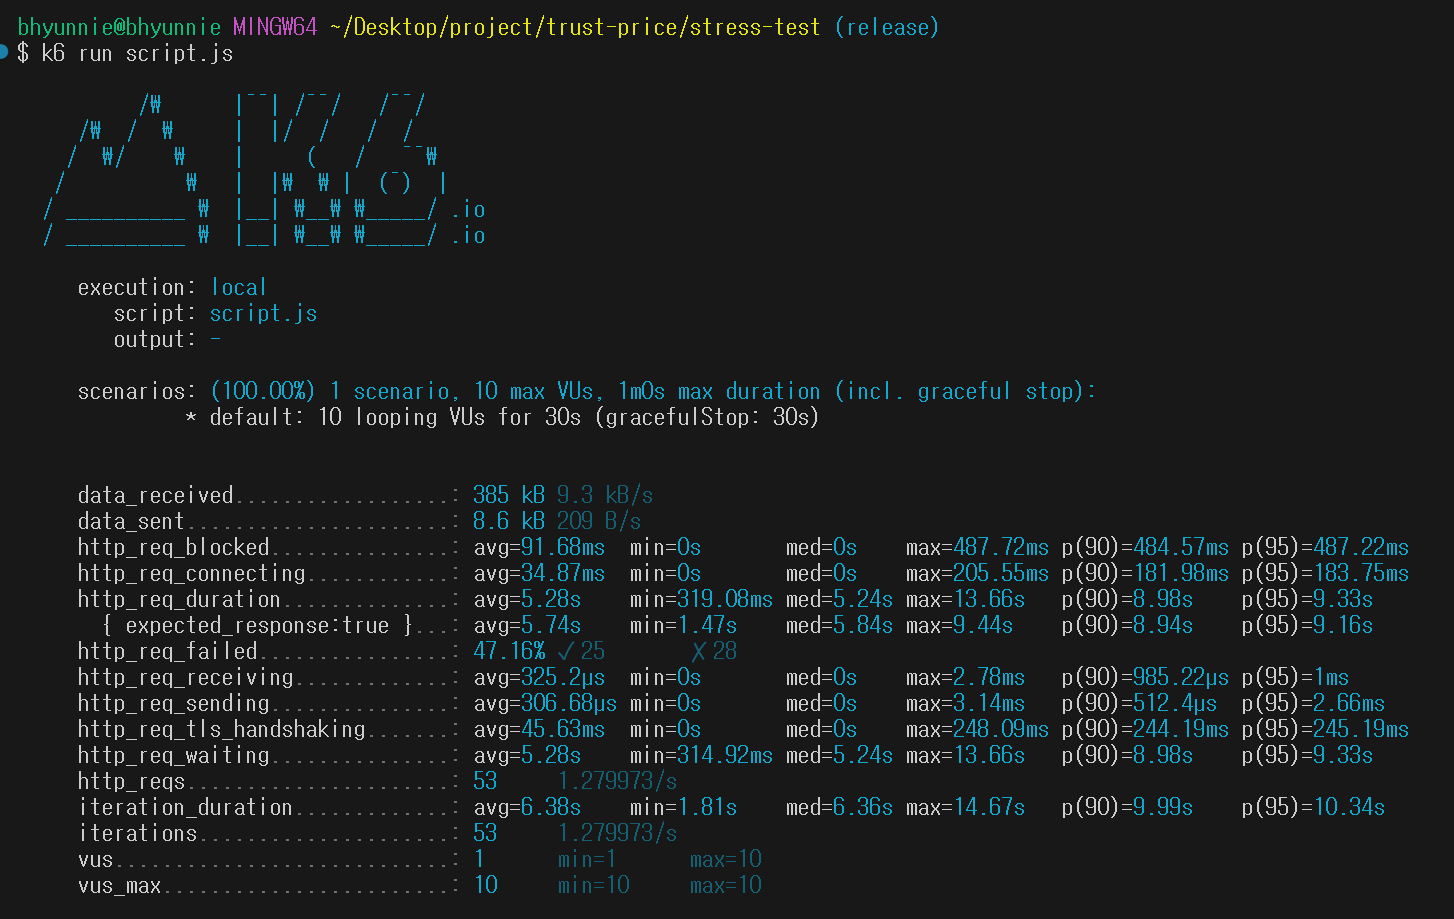
너무나도 편리하게 부하테스트 수행이 가능하다
이제 실제로 내 프로젝트에 사용할 수 있도록 작성해보도록 하겠다.
import http from "k6/http";
import { check, sleep } from "k6";
import { Trend } from "k6/metrics";

export const options = {
  batchPerHost: 10,
  scenarios: {
    category_scenario: {
      executor: "shared-iterations",
      startTime: "0s",
      vus: 10,
      iterations: 2000,
      maxDuration: "10s",
    },
  },
};

export default function () {
  const response = http.get("http://localhost:8080/api/v1/category");
  check(response, {
    "is status 200": (r) => r.status === 200,
  });
}
각 줄에 대한 설명은
https://k6.io/docs/using-k6/scenarios/
Scenarios
Scenarios allow us to make in-depth configurations to how VUs and iterations are scheduled. This makes it possible to model diverse traffic patterns in load tests.
k6.io
공식 문서로 대체합니다.
k6 run script.js위 명령어를 사용하면 잘 된다.

하지만 뭔가 아쉽다.
시각적인 부분이 매우 아쉽다.
이런 아쉬움을 달래기 위해서 우리는 k6가 제공하는 metric 과 Grafana, influxdb를 연동할 것이다.
Step 3. Grafana 설치 influxdb 설치
우선 grafana에서 지원하는 공식 docker-compose.yml 을 받아준다.
https://github.com/grafana/k6/blob/master/docker-compose.yml
k6/docker-compose.yml at master · grafana/k6
A modern load testing tool, using Go and JavaScript - https://k6.io - grafana/k6
github.com
그리고 이 docker-compose.yml 을 실행해준다.
docker-compose up -d influxdb grafana그러면 docker container 가 하나 올라오고 그 안에 grafana와 influxdb가 올라갔을 것이다.
docker-compose 를 이용하면 이미지가 없는 경우 자동으로 받아서 올려주는 편리함이 있다.
docker ps
이제 grafana에 접속해보자
브라우저에서 localhost:3000 으로 들어간다.
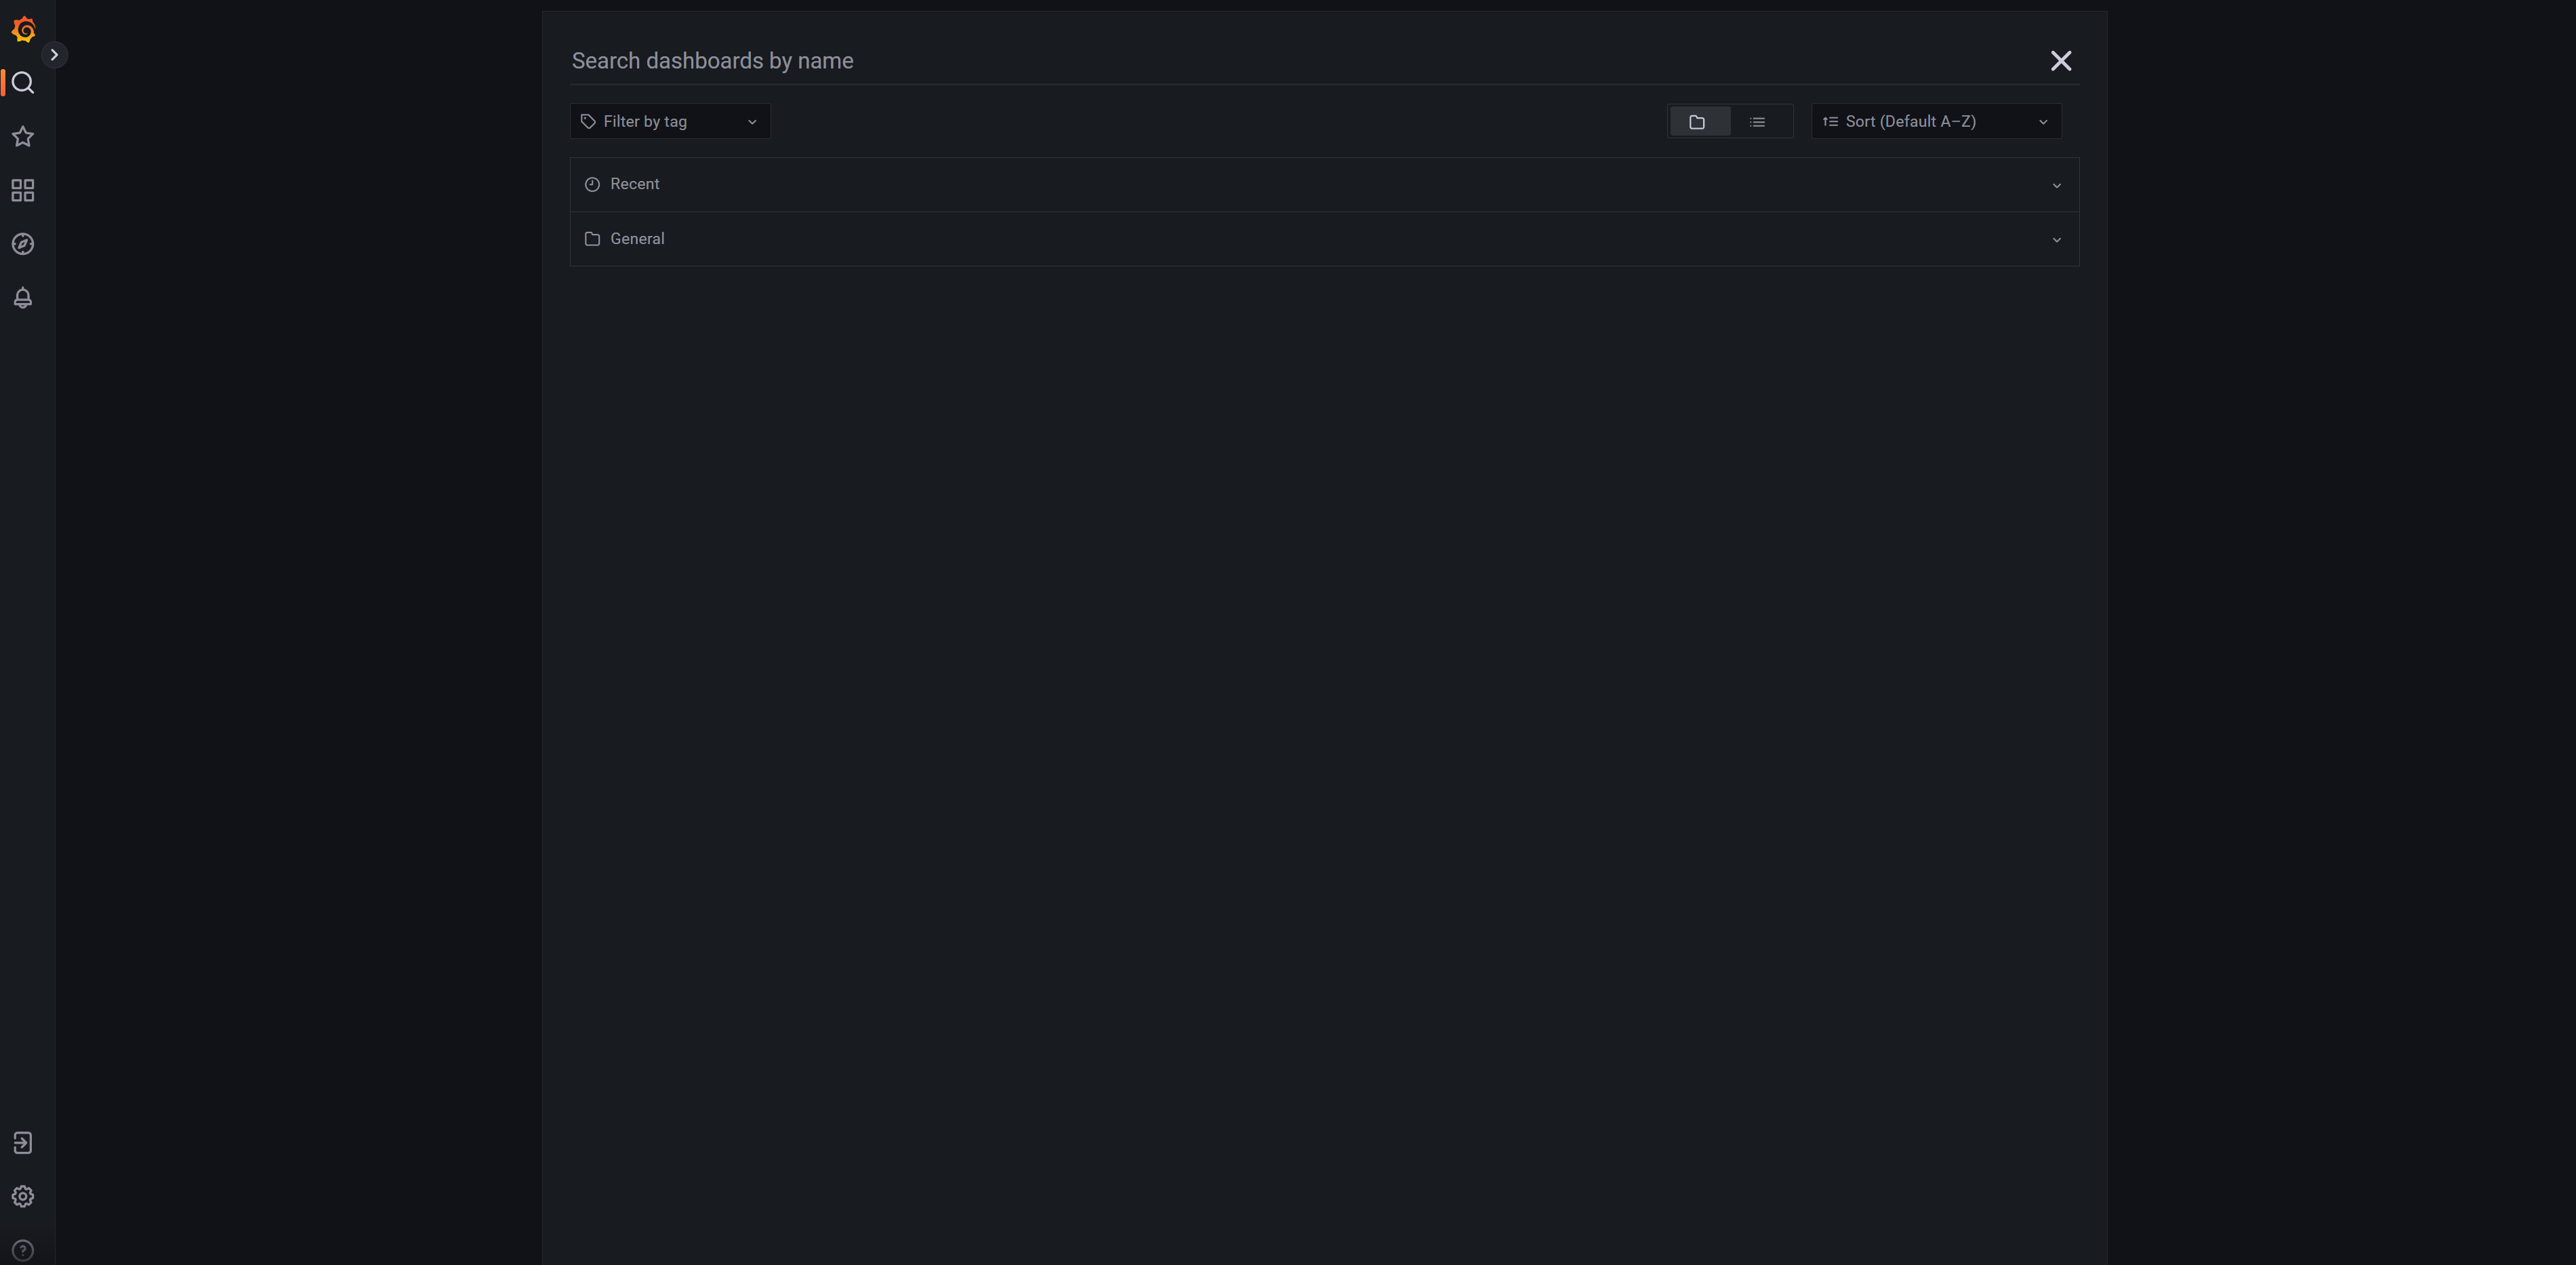
이 화면이 뜨면 잘 된것
이제 grafana에 influxdb를 연동해보자
하단 setting - data resource - add data resource
특별히 조심해야할 부분이 HTTP - URL 부분에 http://influxdb:8086 으로 입력해주어야한다.
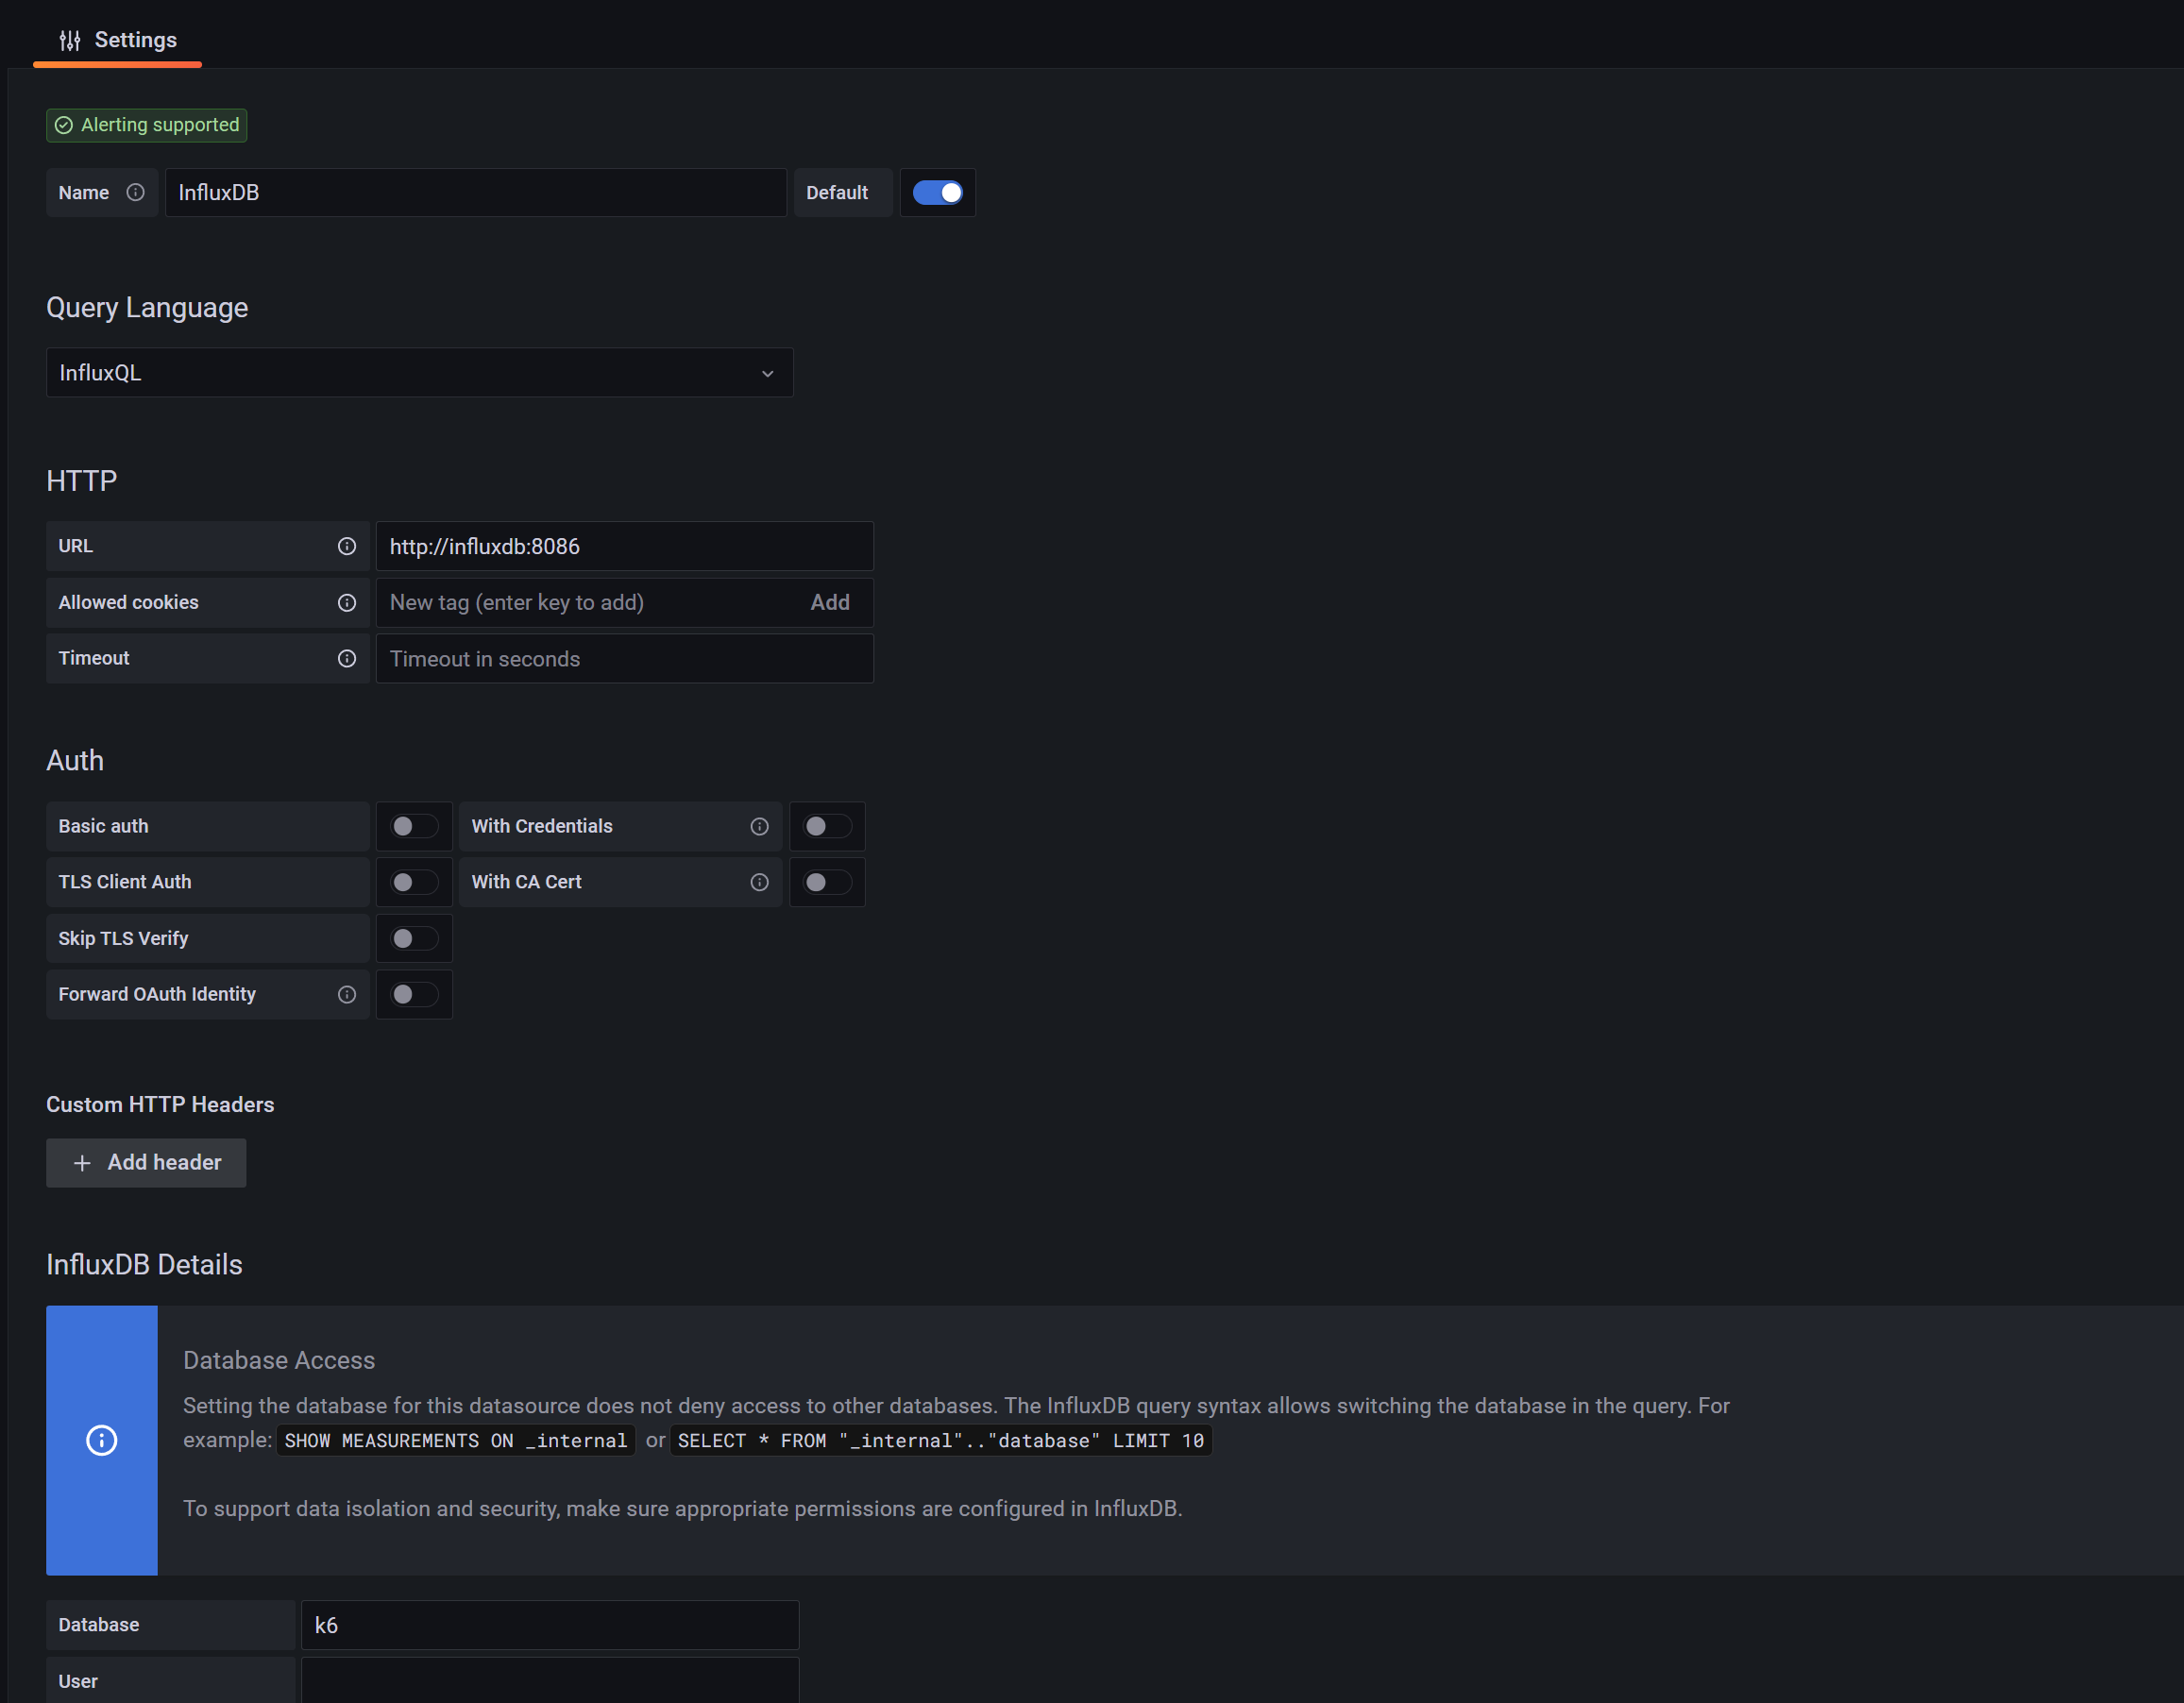
그럼 연결까지는 완료 되었는데
남들 다 보는 그래프는 Dashboard - new 버튼에 마우스를 올리면 import 가 있다.
여기서 import 를 해주면된다.
import 할 때 id 에 2587을 입력해주면 grafana 에서 만든 템플릿을 가져다 쓸 수 있다.

이제 이렇게 나온다.
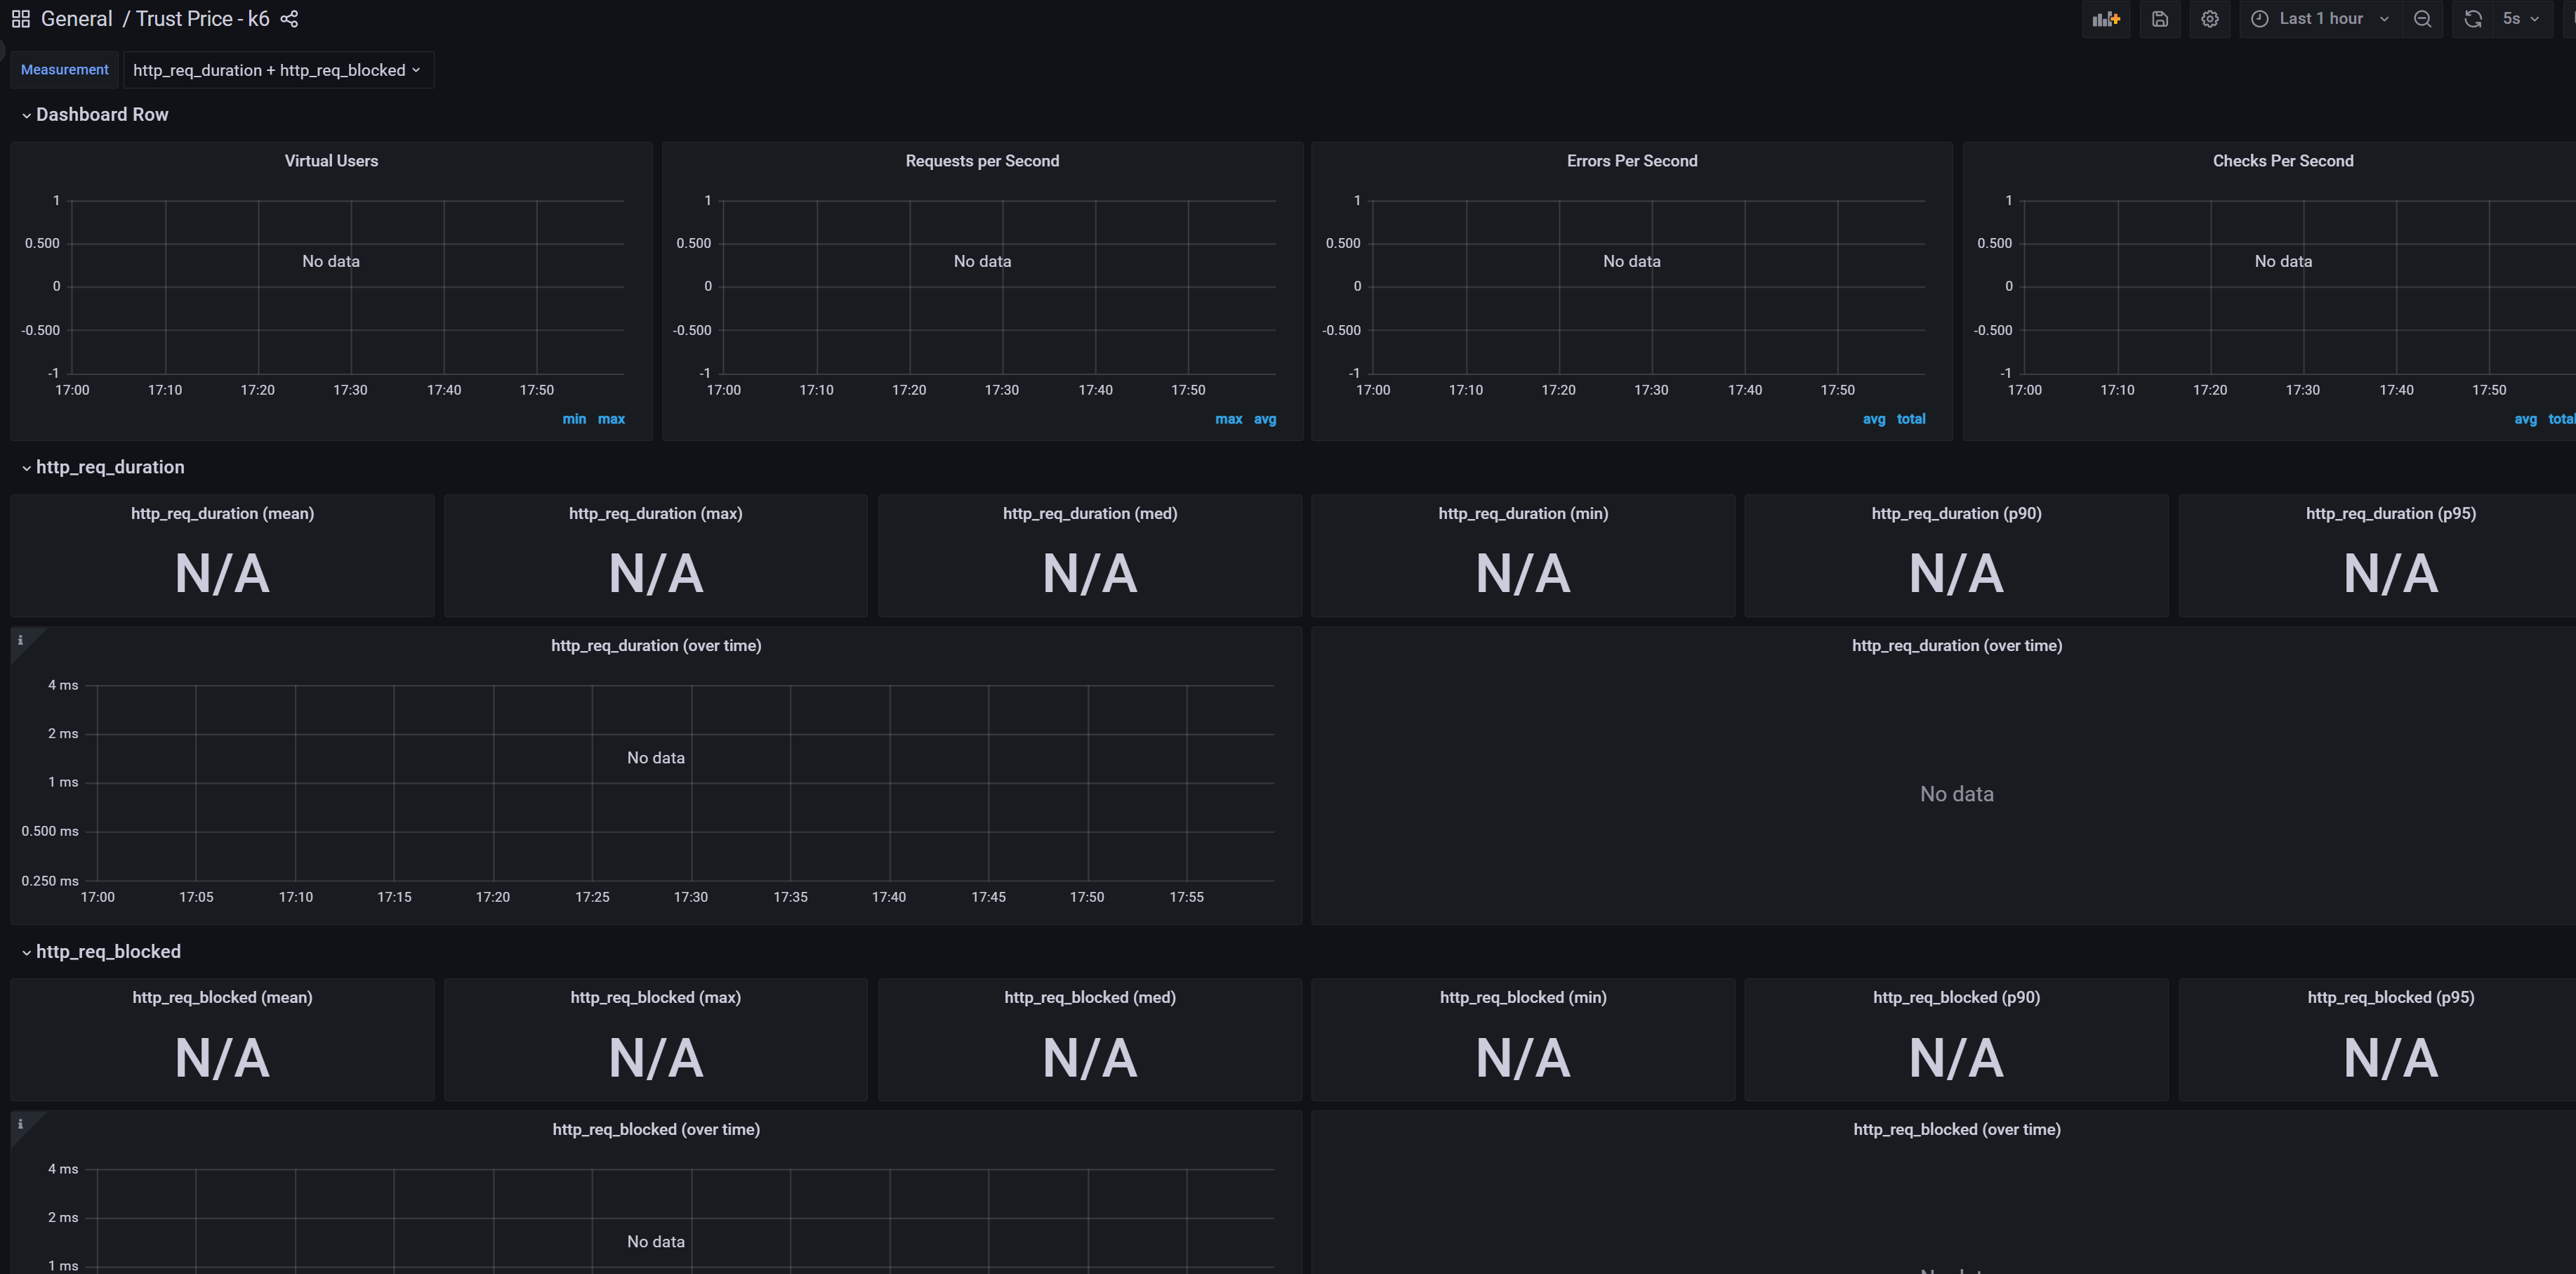
여기까지 따라왔다면 아주 잘 되고 있는것.
Step 4. K6 - InfluxDB 연동
이제 메트릭을 표현하기 위해 K6 테스트 데이터를 influxdb에 저장해주어야한다.
이 저장 방법은 매우매우 간단한데
그저 K6 실행 시 --out 옵션을 주면 된다.
k6 run --out influxdb=http://{influxdb host}:{influxdb port}/{influxdb명} {실행 할 스크립트 경로}
//k6 run --out influxdb=http://localhost:8086/k6 ./scripts/script.js
이렇게 실행하게 된다면 influxdb에 아주 이쁘게 데이터가 들어가게 되고
influxdb를 연동해놓은 grafana로 가서 보게된다면 아래와 같이 잘 보이게 된다.

Step 5. 트러블슈팅
1. k6는 docker 를 왜 안써?
사실 가이드라인과 docker-compose.yml 을 보면 docker로 사용하는 예제이다.
하지만 내가 개인적이고 주관적으로 봤을 땐 굳이다.
우리가 nodejs 프로젝트를 돌린다고할 때
Nodemon을 docker로 돌리지는 않는 것 처럼
굳이 포트열고 계속해서 띄워놓을 필요가 없는 것을 docker 로 돌릴 필요는 없다는 판단이다.
k6를 로컬에 설치하기 싫어잇! 하는거면 뭐 설치안하고 해도 되긴하는데,
docker 내부와 마운팅을 해야하는 부분도 귀찮아질 수도 있고 컨테이너와 컨테이너간의 통신인 네트워크 설정도 해주기가 귀찮아질 수 있다.
그래도 혹시 모르니... 3시간 삽질하면서 얻은 정보라도 남길란다.
일단 docker-compose.yml 부분을 수정해야한다.
networks:
  k6:
  grafana:

services:
  influxdb:
    image: influxdb:1.8
    networks:
      - k6
      - grafana
    ports:
      - "8086:8086"
    environment:
      - INFLUXDB_DB=k6

  grafana:
    image: grafana/grafana:9.3.8
    networks:
      - grafana
    ports:
      - "3000:3000"
    environment:
      - GF_AUTH_ANONYMOUS_ORG_ROLE=Admin
      - GF_AUTH_ANONYMOUS_ENABLED=true
      - GF_AUTH_BASIC_ENABLED=false
    volumes:
      - ./grafana:/etc/grafana/provisioning/

  k6:
    image: grafana/k6:latest
    networks:
      - k6
    ports:
      - "6565:6565"
    environment:
      - K6_OUT=influxdb=http://influxdb:8086/myk6db
    volumes:
      - ./scripts:/scripts // <-- 요 부분 수정 example -> scripts
현재 docker-compose.yml 기준으로 같은 경로의 script 디렉토리를 docker container 내부의 scripts 폴더와 마운팅하는 것이다.
그리고 명령어 수행
docker-compose run -v /%cd%/scripts k6 run /scripts/script.js
만약 아래 명령어에서 아래와 같은 오류가 난다면 맨앞에 /를 붙여야한다.
docker-compose run -v $(pwd)/scripts k6 run /scripts/script.js
docker-compose run -v $PWD:/scripts k6 run /scripts/script.js
docker-compose run -v %cd%/scripts k6 run /scripts/script.js
docker-compose run -v /$(pwd)/scripts k6 run /scripts/script.js
docker-compose run -v /$PWD/scripts k6 run /scripts/script.js

// Error!
Error response from daemon: invalid mount config for type "volume": invalid mount path: '%cd%/scripts' mount path must be absolute
제대로 수행이 된다면
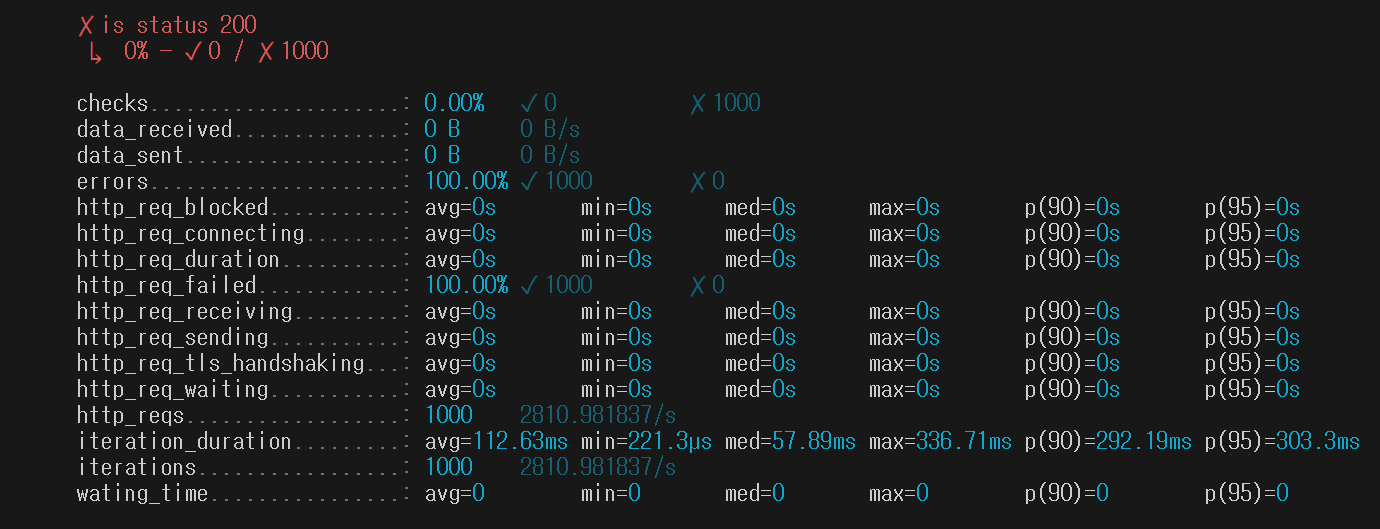
수행은 되는데 저건 컨테이너간의 네트워크를 뚫어주지 않아서 모든 요청이 실패로 끝나서 저렇다.
네트워크 뚫는건 알아서 HAEBOZA
근데 이 명령어 수행할 때마다 컨테이너 죽은거 하나씩 생김..

docker-compose가 컨테이너 띄워서 명령 수행하고 자동으로 닫힘..
그냥 로컬로 쓰자..
Go로 만든거라 가볍다구! 찡긋 ( > . o )
2. Errors per Second - No Data 문제

종종 Errors Per Second 에 No Data 라고 뜨는 경우가 있다.
이런 경우 잘못 생성된 것이니 빨간색 동그라미 부분을 확인하면 된다.
저 버튼들 혹은 쿼리를 잘 사용하면 커스텀 패널도 만들 수 있으니 잘 활용해보자
Step 6. 출처
k6 Documentation
The k6 Documentation helps you to use k6 to get your performance testing on the right track. Learn more about load and performance testing. Get started in minutes.
k6.io
https://yeon-dev.tistory.com/203
[Spring] SrpingBoot K6 + Grafana 부하 테스트 및 모니터링
SpringBoot 프로젝트에 K6 + Grafana + InfluxDB를 사용해서 부하 테스트와 성능 테스트를 진행해보겠다. 1. k6 설치 cmd 창에 다음을 입력한다. window가 아닌 다른 환경이라면 여기를 참고하면 된다. choco inst
yeon-dev.tistory.com
부하테스트 나도 할 수 있다!
'Back End > SPRING BOOT' 카테고리의 다른 글
| Spring boot AWS 배포, 나도 할 수 있을까? (0) | 2024.05.25 |
|---|---|
| [Intellij] Annotation 작동 안함 고장 비상! (0) | 2024.01.08 |
| 환경변수 주입하기 .with Intellij (0) | 2024.01.08 |
| [KOTLIN] JPA LOGGING SPRING BOOT 3.x.x (1) | 2023.12.27 |
| [KOTLIN] JPA - SPRINGBOOT No-arg constructor Error (0) | 2023.12.26 |

백엔드는 못말려
포스팅이 좋았다면 "좋아요❤️" 또는 "구독👍🏻" 해주세요!

![[Intellij] Annotation 작동 안함 고장 비상!](https://img1.daumcdn.net/thumb/R750x0/?scode=mtistory2&fname=https%3A%2F%2Fblog.kakaocdn.net%2Fdna%2Fb3Hro4%2FbtsC85P7lHE%2FAAAAAAAAAAAAAAAAAAAAAGu7lKahkCwJeaI8lXWCc8wSBr06PPJpD3DCPnn10qwO%2Fimg.jpg%3Fcredential%3DyqXZFxpELC7KVnFOS48ylbz2pIh7yKj8%26expires%3D1772290799%26allow_ip%3D%26allow_referer%3D%26signature%3DfBt%252FLDbUxFHwQ1MiiKAScH8whNg%253D)

![[KOTLIN] JPA LOGGING SPRING BOOT 3.x.x](https://img1.daumcdn.net/thumb/R750x0/?scode=mtistory2&fname=https%3A%2F%2Fblog.kakaocdn.net%2Fdna%2FmJfK2%2FbtsCODZ6amc%2FAAAAAAAAAAAAAAAAAAAAAMh-j8c4mWGgH5oHpU6Qg4TpGbUWyedaCfzltq5IuBdQ%2Fimg.png%3Fcredential%3DyqXZFxpELC7KVnFOS48ylbz2pIh7yKj8%26expires%3D1772290799%26allow_ip%3D%26allow_referer%3D%26signature%3Dg8l%252B0TJu2iysSNSHDUdFiC0ZWxY%253D)